Ping Pong Paddle Rubber: The Complete Replacement Kit Guide
Search “ping pong paddle rubber” and you’ll get flooded with results that mix complete pre-assembled paddles, rubber sheets, glue, cleaning kits, and protective film all under one label. That’s confusing if you’re expecting a straight ranking of rubber sheets — but it’s also not entirely wrong, because replacing your paddle’s rubber genuinely does require more than just the sheet itself.
We’ve already covered a straight rubber-sheet ranking in our general best ping pong rubber guide. This page is different on purpose: it’s the complete kit, the sheet plus every tool you actually need to remove your old rubber and mount new rubber correctly, with one genuine, currently-available product picked for each step.
Table of Contents
What Replacing Paddle Rubber Actually Involves
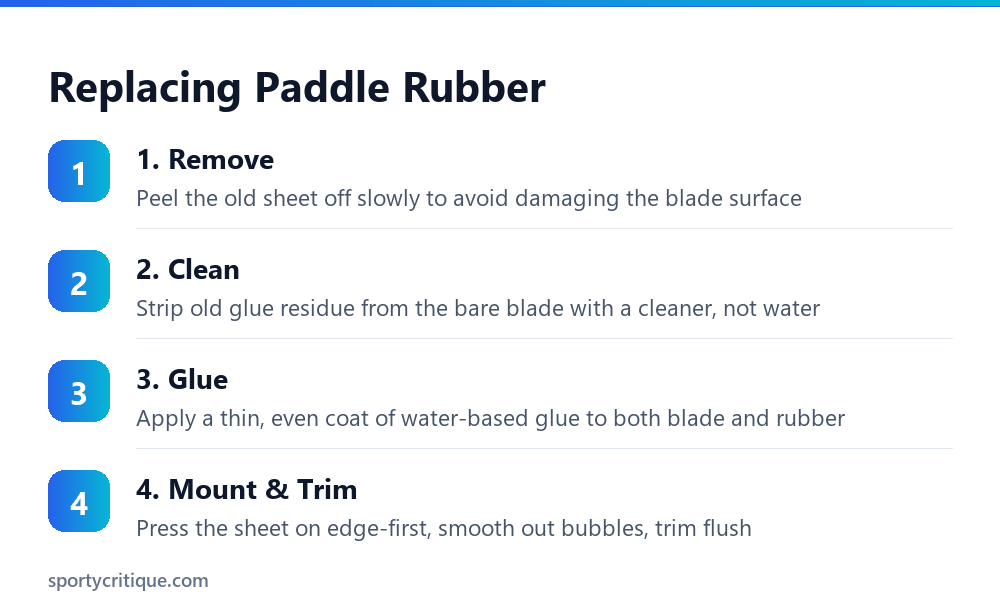
The whole process takes about 20-30 minutes once you’ve done it a few times, and every step below maps to one of the five products in this guide.
Step 1: Remove the Old Rubber
Peel the old sheet off starting from one corner, pulling slowly and at a low angle rather than yanking straight up. Going too fast risks tearing small splinters out of the blade’s top ply, which is soft wood on most beginner and intermediate blades and can leave a rough patch that stops the next sheet from sitting flat. If the rubber resists, warm it slightly with your hands first — old glue gets more brittle and easier to release once it’s been worked a little.
Step 2: Clean the Bare Blade
Once the sheet is off, you’ll usually see a thin, uneven layer of dried glue left on the blade surface. This has to come off before new rubber goes on, or the new sheet will sit on top of old, cracked glue instead of directly on the blade — which changes the feel and shortens how long the new mount lasts. A dedicated cleaner lifts this residue faster and more evenly than a dry cloth alone, especially in the corners near the edge tape.
Step 3: Apply Glue to Both Surfaces
Water-based table tennis glue goes on both the blade and the back of the rubber sheet, not just one side — that’s what makes it different from ordinary craft glue. Apply a thin, even coat with the sponge applicator that usually comes with the bottle, let both surfaces air-dry until they’re tacky but not wet (check your specific glue’s instructions, but a few minutes is typical), then bring them together.
Step 4: Mount and Trim
Line the rubber up with one edge of the blade first, press that edge down, and roll the rest of the sheet down from there rather than dropping it flat all at once — this is the single biggest factor in avoiding trapped air bubbles. Smooth outward from the center with your palm, then trim the overhang flush with the blade edge using a sharp blade or paddle-specific trimmer.
Which Rubber Sheet Should You Actually Pick?
The two rubber sheets in this kit sit at different points on the control-to-power spectrum, and picking between them matters more than picking between glue brands.
- Coherny (budget, 2.2mm all-round): forgiving on off-center hits, easier to control, the safer choice if you’re replacing rubber for the first time or still building consistent technique.
- DHS Hurricane 3-NEO (premium, tacky offensive): rewards a full committed loop swing with more spin, but punishes a passive or incomplete stroke — better suited to players who already loop consistently.
If you’re not sure which category you fall into, the Coherny sheet is the safer first replacement. You can always step up to the DHS pick on your next rubber change once your stroke has developed further.
The 5-Piece Replacement Kit
1. Coherny Red/Black Rubber Sponge — Budget Rubber Sheet
Coherny Red/Black Ping Pong Rubber Sponge, $15.99, is a 2.2mm all-round sheet that’s a reasonable first replacement if you’re not chasing competition-level spin. Comes as a 2-pack, so you can do both sides of the paddle from one purchase.
2. DHS Hurricane 3-NEO — Premium Rubber Sheet
DHS Hurricane 3-NEO Table Tennis Rubber Sheet, $36.69, is the step-up pick once your technique outgrows a generic all-round sheet — see our Chinese rubber guide for the full breakdown of why this specific sheet plays differently from a standard tensor rubber.
3. 1DFAUL Table Tennis Glue — Water-Based Glue
1DFAUL 100ml Table Tennis Glue, $9.99, is a quick-dry, water-based adhesive. This matters more than it sounds: older high-VOC “speed glues” that used to be popular for extra spin are banned under current ITTF rules, so any glue you buy today should be explicitly water-based like this one.
4. Rubber Cleaner Spray + Sponge — Maintenance
200ml Table Tennis Paddle Cleaner Spray and Rubber Cleaner Sponge, $13.99, isn’t just for after you’ve mounted new rubber — use it to strip old glue residue off the bare blade before mounting, and then to clean the new sheet after every session going forward.
5. Protective Film Sheets — Storage
2 Pc Yellow Table Tennis Racket Sticky Film Sheets, $5.99, is a thin static-cling film you press over freshly mounted rubber before storing your paddle. It keeps dust off between sessions without needing to reclean every time you pull the paddle out of your bag.
What The Full Kit Costs

A full first-time kit — one rubber sheet, glue, cleaner, and protective film — runs about $46 to $67 depending on which rubber sheet you pick. After that first purchase, the glue, cleaner, and film all last for several rubber changes, so repeat replacements mostly just cost the rubber sheet itself.
How Often You Actually Need To Replace Rubber
- Casual/recreational play: every 6-12 months, or when the surface looks visibly worn or shiny
- Regular club play (2-3x/week): every 3-6 months
- Competitive/tournament play: as often as every 1-2 months for players relying on maximum spin
- Any time you notice reduced grip on serves — that’s usually the first sign before visible wear appears
Common First-Timer Mistakes
- Trapped air bubbles: usually from pressing the whole sheet down at once instead of rolling it on from one edge. If you catch it early, gently peel back to the bubble and re-press before the glue fully sets.
- Rubber lifting at the edges after a few sessions: almost always insufficient glue coverage right at the border, or trimming so close that there’s no glued margin left to hold the edge down.
- Rubber feels dead right after mounting: normal for the first few sessions with a fresh sheet — the tackiness and feel settle in as the glue fully cures and the surface breaks in.
- Uneven trim line: trim slowly in short strokes rather than one long cut, following the blade’s edge rather than eyeballing a straight line separately.
Frequently Asked Questions
Do I need all 5 items, or just the rubber sheet?
If you’re paying a shop to mount your rubber, you only need to buy the sheet. If you’re doing it yourself, glue is non-negotiable and a cleaner makes the bare-blade prep step much easier — the protective film is the only genuinely optional item.
Can I reuse old glue residue instead of cleaning it off?
No — old, dried glue residue creates an uneven surface that stops new rubber from mounting flat, which affects both feel and performance. Always clean the blade back to bare wood or carbon before mounting a new sheet.
Is speed glue still legal?
No. High-VOC speed glue was banned by the ITTF in 2008 over health concerns and the unfair spin advantage it created. Any glue sold today for regulation play should be water-based, like the pick in this guide.
How is this different from your general best rubber guide?
Our general rubber guide ranks sheets against each other by playing style. This page covers the full replacement process — the sheet plus the glue, cleaner, and film you need to actually install and maintain it — for anyone doing the swap themselves for the first time.
Can I mount rubber without a cleaner?
You can wipe the blade with a dry cloth, but a dedicated cleaner removes oily glue residue a dry cloth can’t fully lift, which matters for how flat and secure the new sheet sits.
Do both sides of the paddle need the same rubber sheet?
No — many intermediate and advanced players deliberately run different rubber on each side, often a tackier offensive sheet on the forehand and a softer control-oriented sheet on the backhand. Beginners are usually better off matching both sides until they’ve developed a clear sense of their own playing style.
How long should I wait after mounting before playing?
Most water-based glues are playable within an hour once the sheet is fully pressed down and any trapped air is worked out, though letting it sit overnight gives the strongest possible bond before hard competitive play.
As an Amazon Associate, we earn from qualifying purchases through links on this page.

Ping Pong Reviewed is an equipment review site covering table tennis and baseball gear. Specifications are checked against manufacturer listings, and prices against live retail pages, before publication.