Sealing a Table Tennis Blade: Why, When and How to Do It Right
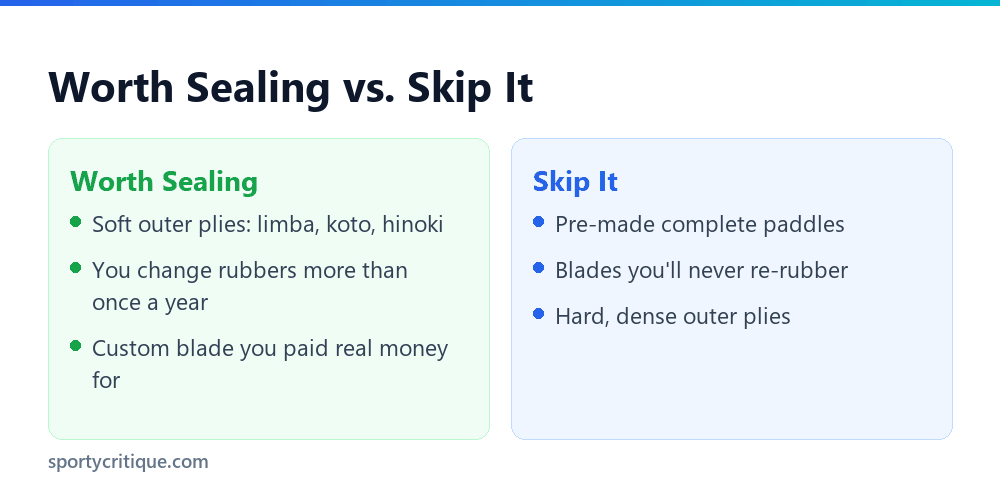
Sealing means applying one thin protective coat to a bare blade so the wood doesn’t tear when you peel rubber off. It takes 20 minutes, costs a few dollars, and is worth doing if your blade has soft outer plies (limba, koto, hinoki) and you change rubbers more than once a year. Skip it on pre-made paddles and on blades you’ll never re-rubber.
Every time you peel rubber off an unsealed blade, you’re gambling a little wood. Soft outer veneers love to come away with the glue, leaving craters in a blade you paid real money for — and unlike a rubber, a blade with chunks missing doesn’t get replaced for $30.
- →Sealing protects the blade during rubber removal, not during play
- →Worth it for soft-ply custom blades; pointless on pre-mades
- →It’s completely legal — a thin coat doesn’t breach the 85% wood rule
- →One thin coat only — thick sealing deadens the blade’s feel
- →Do it once and the blade is protected for its whole life
Table of Contents
Should you seal your blade?
If you don’t know what your blade’s outer ply is, check the manufacturer’s listing — most publish the construction. Limba is by far the most common outer veneer on all-wood and composite blades, and it’s genuinely soft. If your blade has limba on the outside and you plan to keep it for years, sealing is close to a no-brainer.
Is sealing legal?
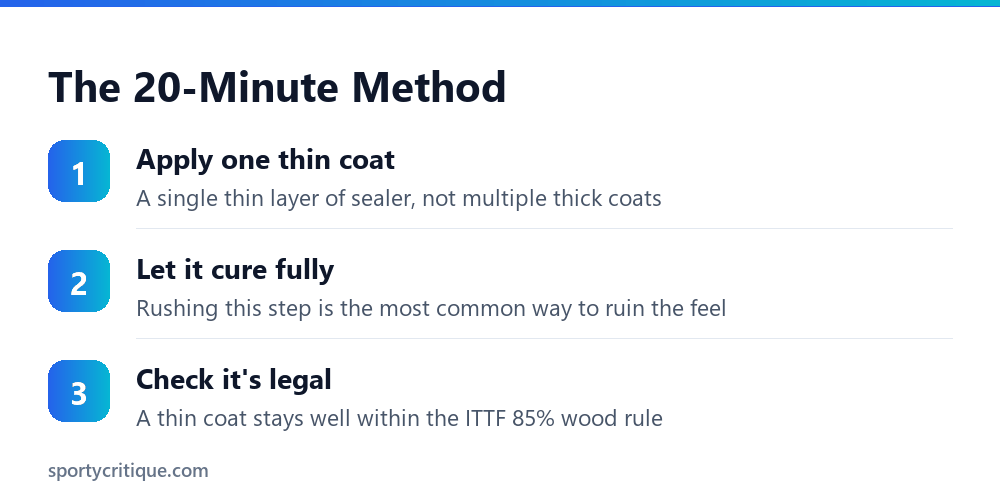
Yes, and it’s worth stating plainly because the question comes up constantly. The ITTF requires that the blade be flat, rigid, and at least 85% natural wood by thickness. A whisper-thin sealing coat doesn’t threaten any of those conditions — it’s measured in microns against a blade several millimetres thick.
The distinction the rules care about is protect versus alter. One thin coat that stops veneer tearing: fine, universally accepted. Multiple heavy coats that stiffen the surface and change how the blade plays: not the intent, and a genuine grey area you have no reason to enter.
What to seal with
- Butterfly, Joola, Revolution No.3
- Formulated to dry thin
- Hard to over-apply
- Recommended for a first attempt
- Thin polyurethane or clear lacquer
- Dilute it; one coat only
- Cheap if you already have some
- Easier to over-apply
- Thick oil-based varnish
- Polyurethane straight from the tin
- Anything leaving a glossy finish
- Spray paint, superglue, PVA
⚠️ Watch out: The failure mode is thickness, not product choice. Almost any thin clear coat will do the job; almost any product applied thickly will deaden the blade. If you’re using something general-purpose rather than a table tennis sealer, dilute it and apply less than feels sufficient.
The 20-minute method
The whole skill is restraint. A sealed blade should look almost exactly like an unsealed one — you’re adding protection, not a finish.
📊 Note: Some players lightly sand the dried coat with very fine paper before gluing, to give the glue a slightly keyed surface. It’s optional; water-based table tennis glue bonds perfectly well to a smooth sealed surface.
Does sealing change how the blade plays?
A proper thin coat: no perceptible change for the overwhelming majority of players. Elite players with very specific feel preferences occasionally claim they can detect it, and it’s possible — but at club level the difference is somewhere between negligible and imaginary.
A thick coat: yes, and not in a good way. Heavy sealing stiffens the surface and mutes the woody feedback that players buy premium all-wood blades specifically to get. If you’ve spent $150 on a limba-surfaced blade because you liked how it feels, drowning it in varnish removes the reason you bought it.
There’s one modest upside sometimes reported: sealing can make the surface very slightly faster, because a sealed surface transmits energy marginally more directly than raw absorbent wood. Treat that as a footnote rather than a reason — nobody should seal a blade hoping to gain speed.
What sealing does and doesn’t protect against
- ✓Protects against veneer tearing during rubber removal
- ✓Protects against glue soaking into the wood grain
- ✓Makes repeat rubber changes safe and repeatable
- ✓Slows moisture absorption into the blade face
- ✓Stops existing chipping from spreading
- ✕Won’t protect the edges from table collisions — use edge tape
- ✕Won’t fix a warped blade
- ✕Won’t repair delamination between plies
- ✕Won’t make a cheap blade play like an expensive one
- ✕Won’t survive aggressive sanding later
Edge tape and sealing solve different problems, and you want both. Sealing protects the blade face from the glue and the peel; edge tape protects the blade edge from the table, the floor, and your own follow-through. A chipped edge is where delamination starts, and it costs three dollars to prevent.
Know your blade’s outer ply
The whole sealing decision comes down to what’s on the outside of your blade, so it’s worth knowing what you’re holding. Blades are built from layers — usually five or seven plies of wood, sometimes with carbon or arylate layers sandwiched inside — and only the outer ply matters for sealing purposes.
There’s a reason so many blades use soft outer plies despite the fragility: soft veneers give you dwell time. The ball sinks fractionally into the surface and stays on the rubber a moment longer, which is where spin comes from. Hinoki blades are prized by penholders precisely for that feel, and they’re also the most likely to tear if you peel rubber carelessly.
So the softness you’re paying for is the same property that makes sealing sensible. That’s not a design flaw — it’s simply a consequence, and a few dollars of sealer resolves it permanently.
Sealing a blade that’s already damaged
If your last rubber change took chunks of veneer with it, sealing is still the right move — and the repair is more forgiving than it looks.
Smooth the damaged area with fine sandpaper until the edges of the crater aren’t raised. For genuinely deep gouges, a small amount of wood filler levels the surface — apply sparingly, let it cure fully, then sand flush. Then seal as normal.
The blade will play fine. It’ll look like a blade that’s been used and loved, which is what it is. The important part is that sealing stops the damage from spreading — an exposed torn veneer will keep tearing every time you re-rubber, and each cycle takes a little more.
- →Replacing rubber — the safe peel that sealing makes safer
- →Cleaning your paddle — the routine that delays replacement
- →Rubber guide — choosing what goes on top
- →What premium blades cost — and why protecting one matters
Frequently asked questions
Do I need to seal my table tennis blade?
Only if it has soft outer plies (limba, koto, hinoki) and you’ll be changing rubbers more than about once a year. Pre-made paddles and blades you’ll never re-rubber don’t need it.
Is sealing a blade legal in competition?
Yes. The blade must be flat, rigid and at least 85% natural wood by thickness — a thin sealing coat doesn’t affect any of that. It’s standard practice at every level.
Will sealing make my blade faster or slower?
A thin coat makes essentially no difference, with some players reporting a marginal speed increase. A thick coat will stiffen and deaden the blade, which is why the instruction is always ‘one thin layer’.
What can I use if I don’t have blade sealer?
A thin, diluted water-based lacquer or polyurethane, applied as a single light coat. Avoid thick oil-based varnish and anything that leaves a glossy furniture finish.
How often do I need to reseal?
Usually once for the blade’s lifetime. If a rubber peel ever starts lifting the coat itself, one fresh thin coat resets it.
My blade already splintered — can I still seal it?
Yes, and you should. Sand the damaged area smooth, fill deep craters with a little wood filler, then seal. It stops the damage spreading with each future rubber change.
Do professionals seal their blades?
Many do, precisely because they change rubbers constantly. Others rely on careful removal technique and factory-treated surfaces. Both approaches are common.
Should I seal a brand new blade before its first rubber?
That’s the ideal moment, actually — the surface is pristine, there’s no glue residue to clean off, and you never experience a risky peel at all. If you’ve just bought a custom blade with limba or koto outers, sealing it before the first gluing is twenty minutes that protects it for its entire life.
Can I seal a blade that already has rubber on one side?
Yes, but do them one at a time and only when that side is bare. Never apply sealer near an attached rubber — it will bond to the sponge edge and cause problems when you next peel it. Seal the bare side, let it cure fully, re-rubber it, then repeat for the other side at its next change.
How much sealer do I need to buy?
Almost nothing — a small bottle of purpose-made blade sealer will do dozens of blades, since you’re applying a single thin coat to a surface roughly the size of your hand. One bottle typically outlasts several blades, which makes it one of the cheapest protective measures in the sport.

Ping Pong Reviewed is an equipment review site covering table tennis and baseball gear. Specifications are checked against manufacturer listings, and prices against live retail pages, before publication.